1. vit原理
vite: https://github.com/vitejs/vite
面试题:谈谈你对vite的理解,最好对比webpack说明
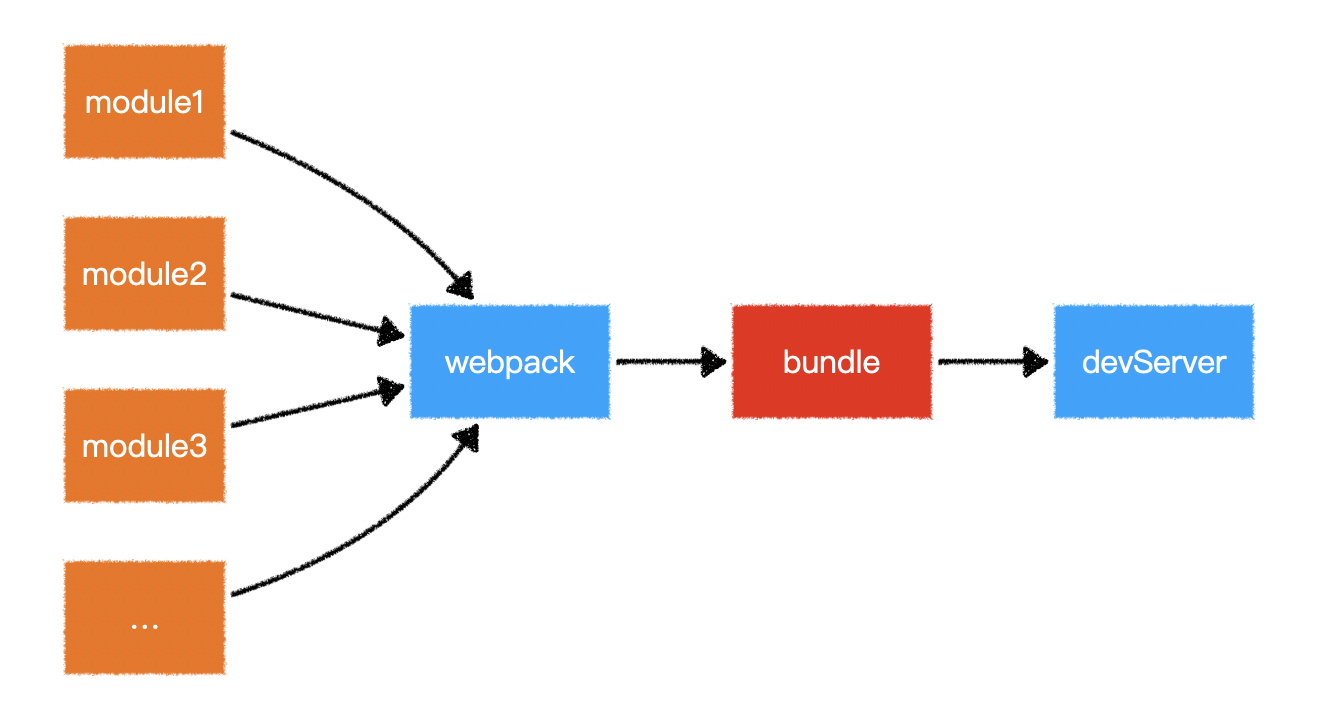
webpack 原理图

webpack是打包所有模块后生成bundle文件,之后服务器访问bundle文件进行呈现;
这就导致修改某一个模块后需要全部重新打包
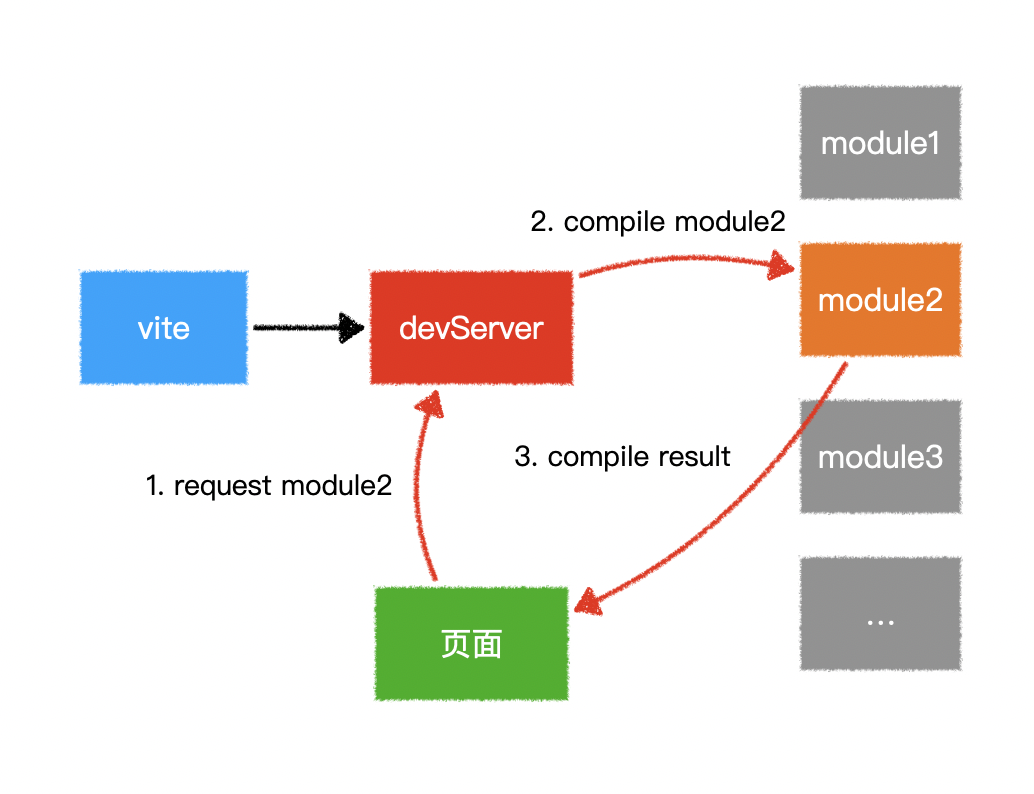
vite 原理图
vite没有打包过程,vite是直接启动一个服务器;
面试题答案:
webpack会先打包,然后启动开发服务器,请求服务器时直接给予打包结果。
而vite是直接启动开发服务器,请求哪个模块再对该模块进行实时编译。
由于现代浏览器本身就支持ES Module,会自动向依赖的Module发出请求。vite充分利用这一点,将开发环境下的模块文件,就作为浏览器要执行的文件,而不是像webpack那样进行打包合并。
由于vite在启动的时候不需要打包,也就意味着不需要分析模块的依赖、不需要编译,因此启动速度非常快。当浏览器请求某个模块时,再根据需要对模块内容进行编译。这种按需动态编译的方式,极大的缩减了编译时间,项目越复杂、模块越多,vite的优势越明显。
在HMR方面,当改动了一个模块后,仅需让浏览器重新请求该模块即可,不像webpack那样需要把该模块的相关依赖模块全部编译一次,效率更高。
当需要打包到生产环境时,vite使用传统的rollup进行打包,因此,vite的主要优势在开发阶段。另外,由于vite利用的是ES Module,因此在代码中不可以使用CommonJS
2. 效率的提升
客户端渲染效率比vue2提升了1.3~2倍
SSR渲染效率比vue2提升了2~3倍
面试题:vue3的效率提升主要表现在哪些方面?
- 静态提升
- 预字符串化
- 缓存事件处理函数
- Block Tree
- PatchFlag
2-1. 静态提升
预编译时: 生成render函数时
2-1-1. 静态节点会被提升
1
2
3
4
5
6
7
8
9
10
11
|
render(){
createVNode("h1", null, "Hello World")
}
const hoisted = createVNode("h1", null, "Hello World")
function render(){
}
|
因为数据一发生改变就会运行render函数;而静态节点是不需要重复编译的;
2-1-2. 静态属性会被提升
1
2
3
| <div class="user">
{{user.name}}
</div>
|
1
2
3
4
5
6
| const hoisted = { class: "user" }
function render(){
createVNode("div", hoisted, user.name)
}
|
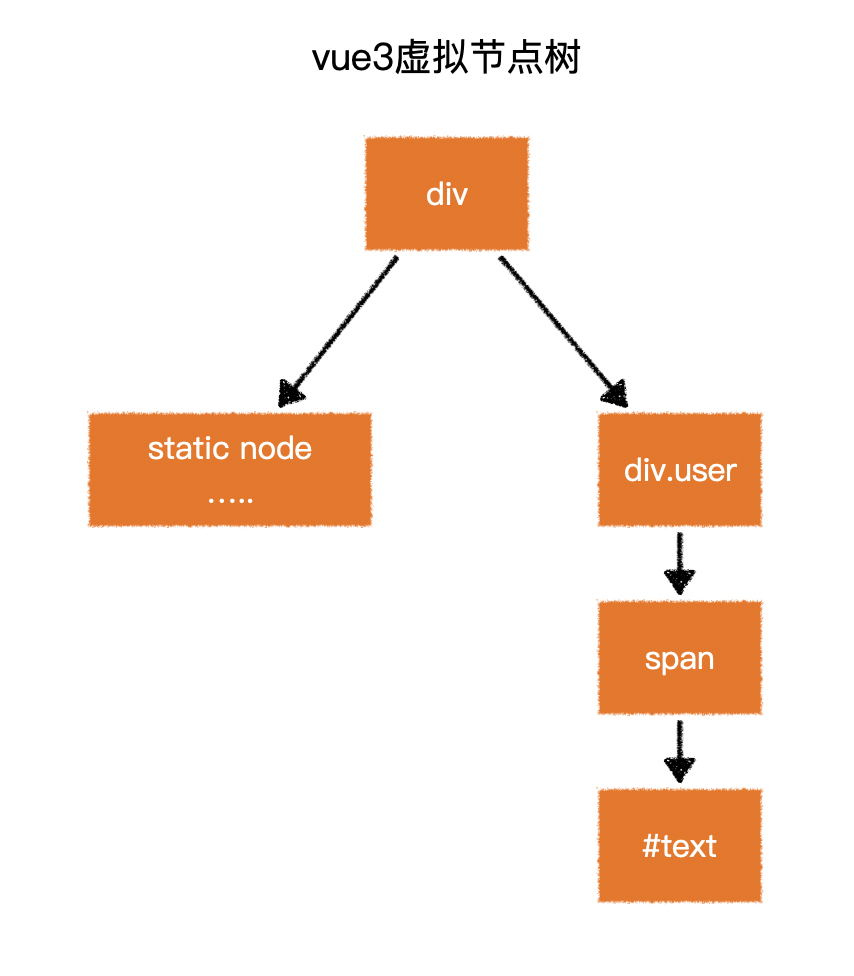
2-2. 预字符串化
在模板编译中
1
2
3
4
5
6
7
8
9
10
11
12
13
14
15
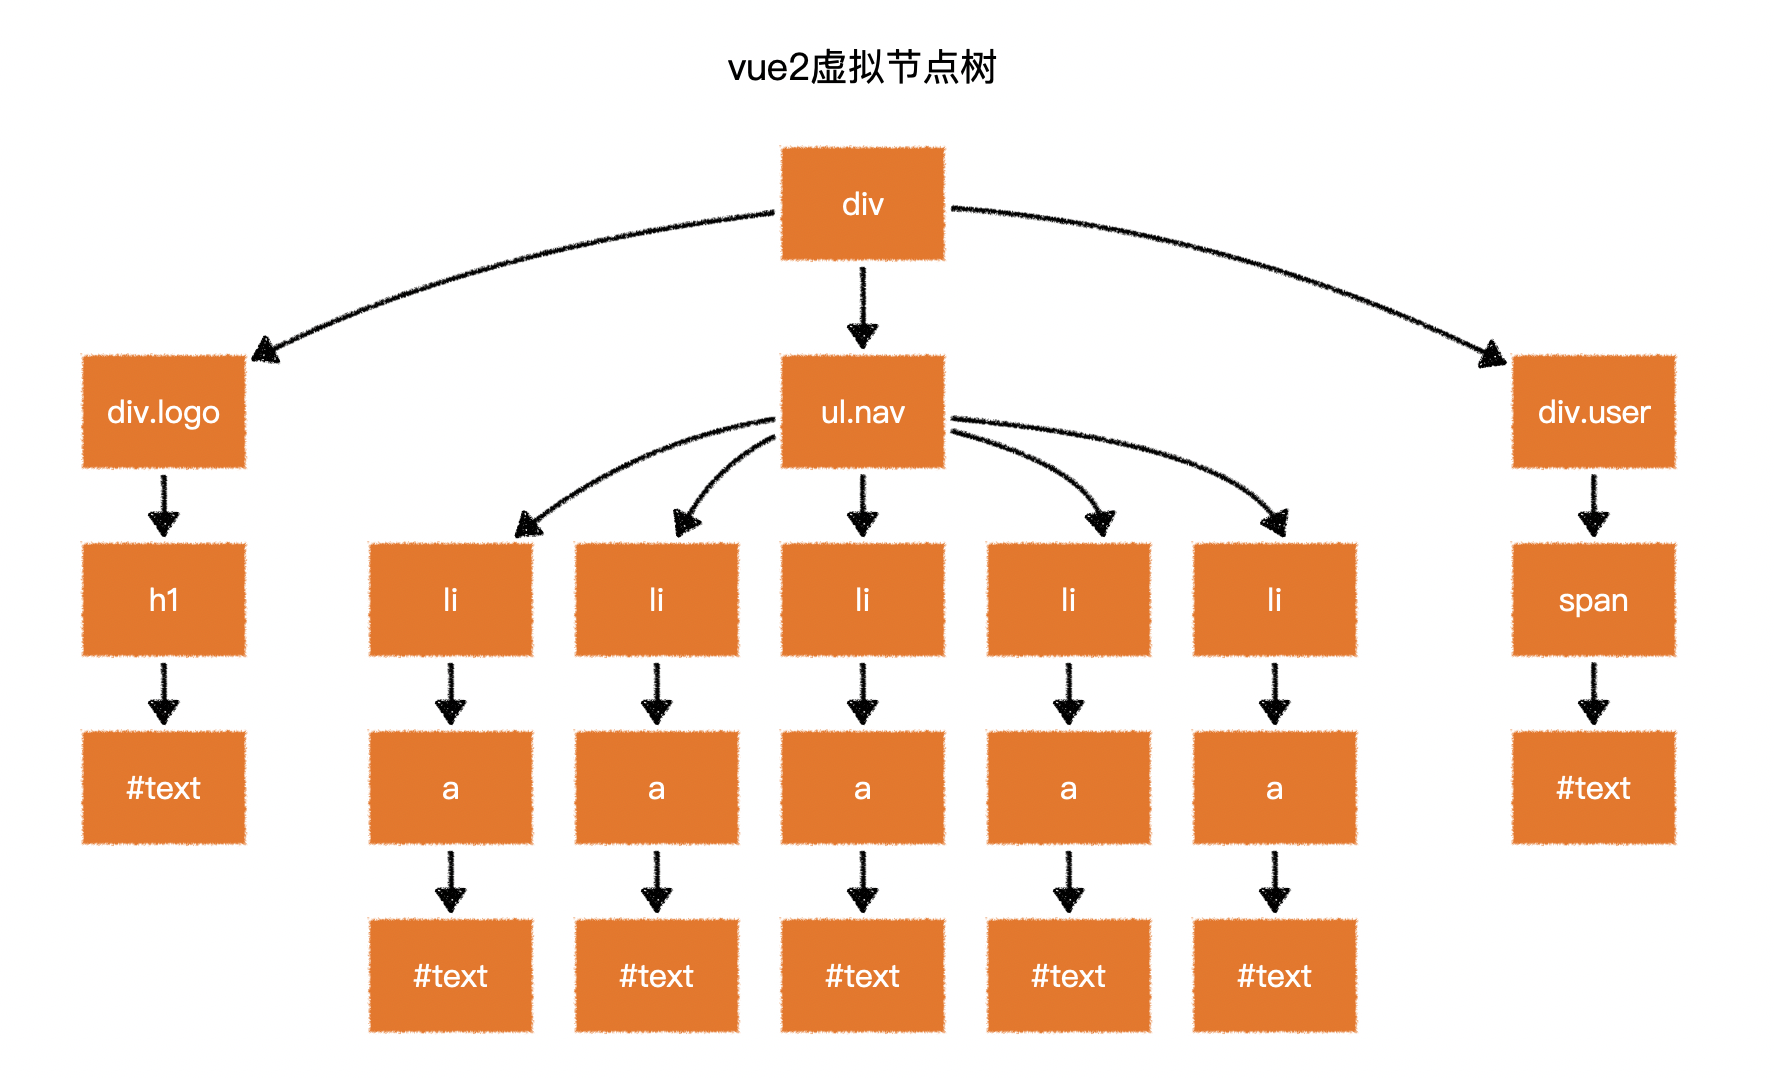
| <div class="menu-bar-container">
<div class="logo">
<h1>logo</h1>
</div>
<ul class="nav">
<li><a href="">menu</a></li>
<li><a href="">menu</a></li>
<li><a href="">menu</a></li>
<li><a href="">menu</a></li>
<li><a href="">menu</a></li>
</ul>
<div class="user">
<span>{{ user.name }}</span>
</div>
</div>
|
当编译器遇到大量连续的静态内容,会直接将其编译为一个普通字符串节点
1
| const _hoisted_2 = _createStaticVNode("<div class=\"logo\"><h1>logo</h1></div><ul class=\"nav\"><li><a href=\"\">menu</a></li><li><a href=\"\">menu</a></li><li><a href=\"\">menu</a></li><li><a href=\"\">menu</a></li><li><a href=\"\">menu</a></li></ul>")
|
根据动静比,智能将大量的连续的静态标签编译为一个不同的字符串节点 (现阶段连续20个静态节点会进行预字符串化)
2-3. 缓存事件处理函数
在模板编译中
1
| <button @click="count++">plus</button>
|
1
2
3
4
5
6
7
8
9
10
11
12
13
14
15
|
render(ctx){
return createVNode("button", {
onClick: function($event){
ctx.count++;
}
})
}
render(ctx, _cache){
return createVNode("button", {
onClick: cache[0] || (cache[0] = ($event) => (ctx.count++))
})
}
|
vue3 中认为事件基本是不会变化的,所以加入了缓存处理
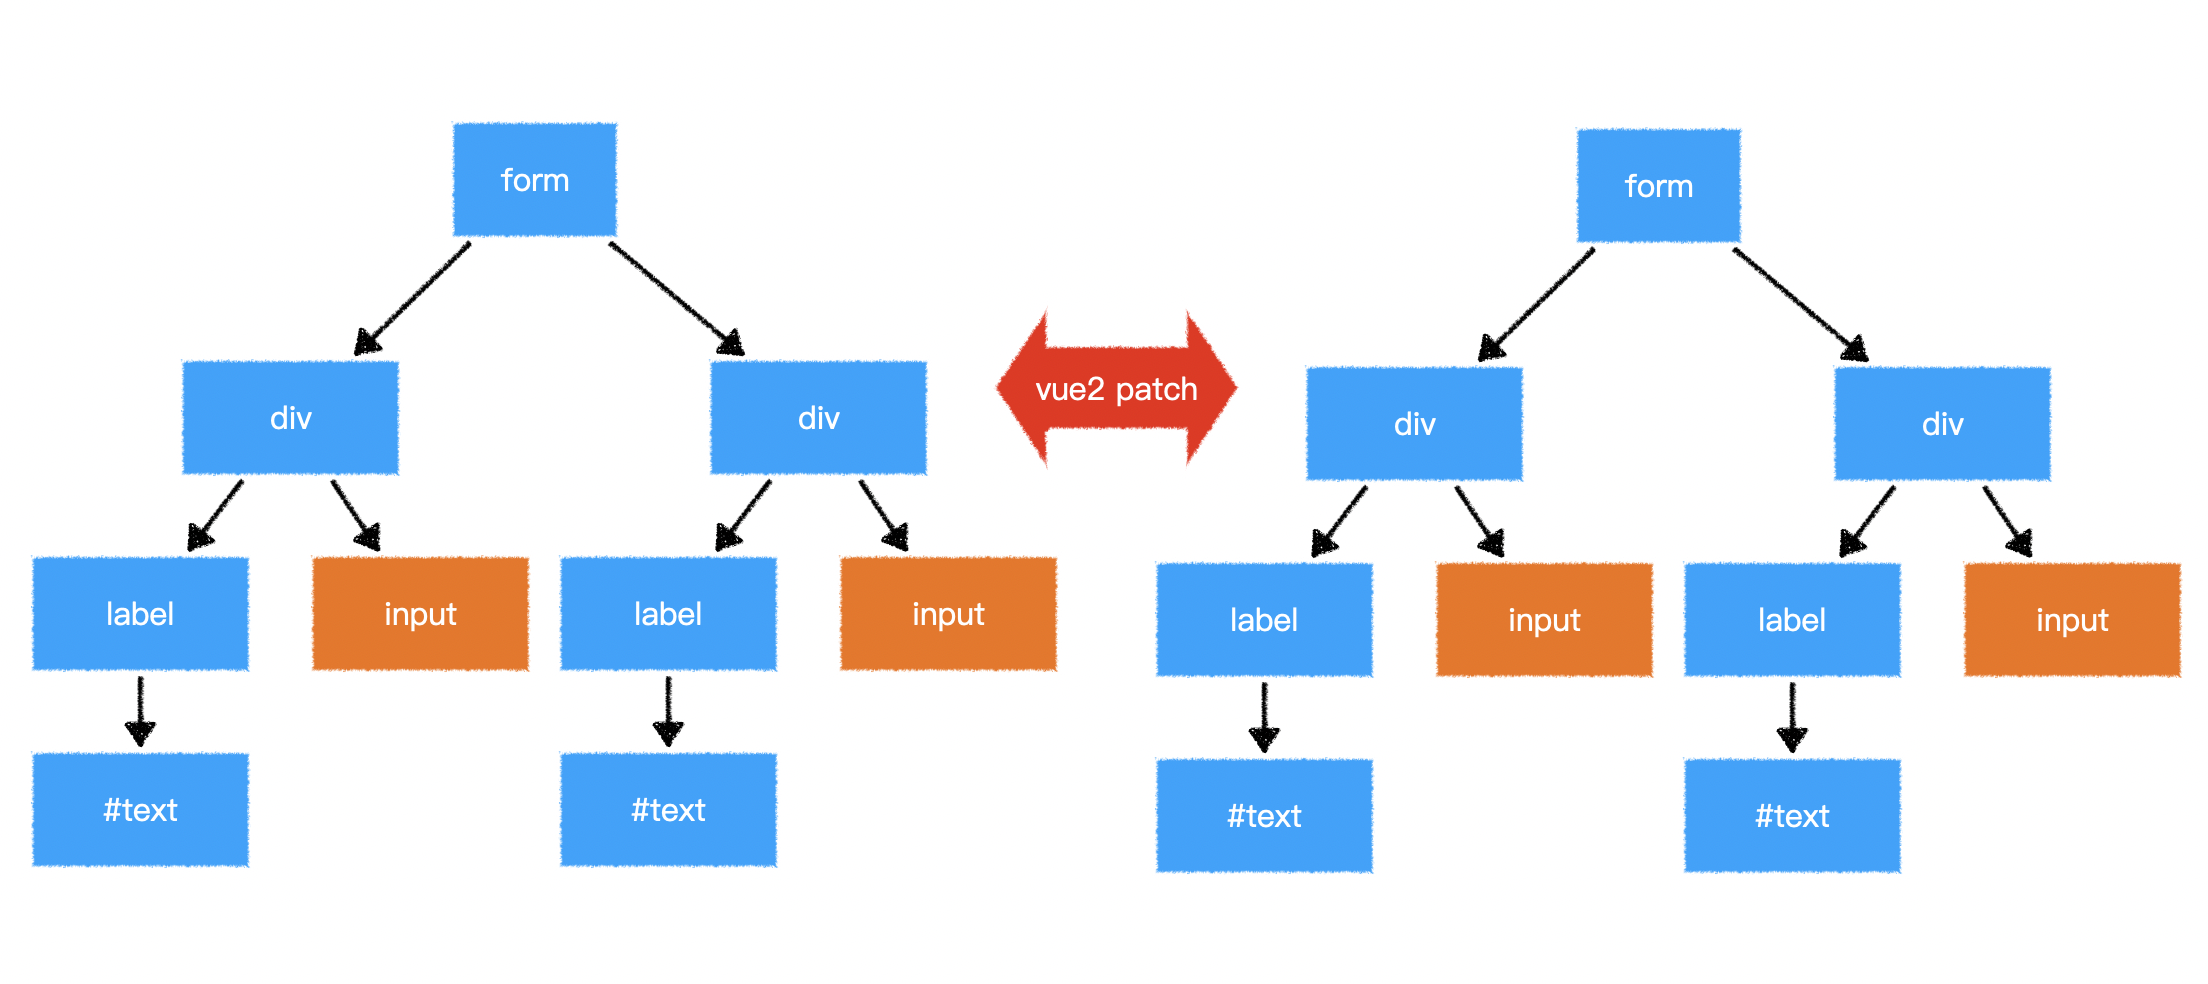
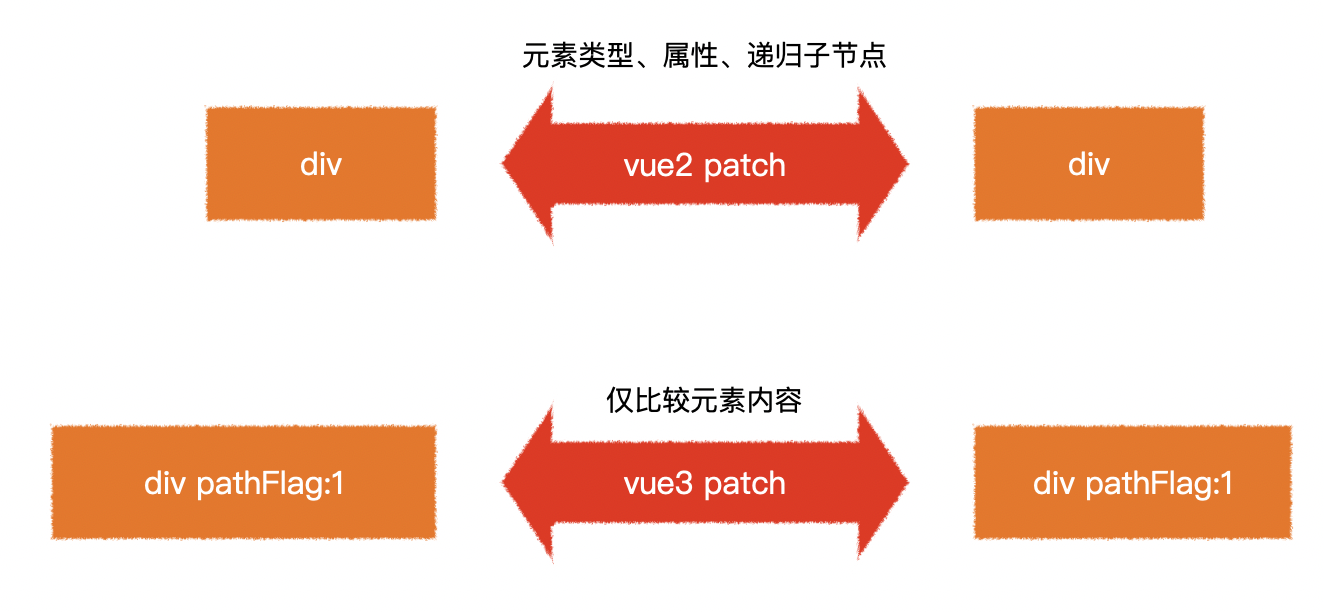
2-4. Block Tree
vue2在对比新旧树的时候,并不知道哪些节点是静态的,哪些是动态的,因此只能一层一层比较,这就浪费了大部分时间在比对静态节点上
1
2
3
4
5
6
7
8
9
10
| <form>
<div>
<label>账号:</label>
<input v-model="user.loginId" />
</div>
<div>
<label>密码:</label>
<input v-model="user.loginPwd" />
</div>
</form>
|
vue2 再节点对比式再用广度优先进行逐个对比;由于静态节点是不会发生变化的所以这样会浪费大量时间;
vue3 在预编译时,生成虚拟节点时会标记节点是静态节点、动态节点或哪部分为动态部分(PatchFlag),这样对比时只比较动态部分;
Block节点中记录了动态节点,对比时直接遍历即可
左block: [input1, input2]
右block: [input1, input2]
当树的某一个分支不稳定的时候,会生成一个新的块,即生成一个新的block节点;
2-5. PatchFlag
vue3针对每一个节点对比时进行了优化
vue2在对比每一个节点时,并不知道这个节点哪些相关信息会发生变化,因此只能将所有信息依次比对
1
2
3
| <div class="user" data-id="1" title="user name">
{{user.name}}
</div>
|
3. API和数据响应式的变化
面试题1:为什么vue3中去掉了vue构造函数?
面试题2:谈谈你对vue3数据响应式的理解
3-1. 去掉了Vue构造函数
在过去,如果遇到一个页面有多个vue应用时,往往会遇到一些问题
1
2
3
4
5
6
7
8
9
10
11
12
13
14
15
16
|
<div id="app1"></div>
<div id="app2"></div>
<script>
Vue.use(...);
Vue.mixin(...);
Vue.component(...);
new Vue({
}).$mount("#app1")
new Vue({
}).$mount("#app2")
</script>
|
在vue3中,去掉了Vue构造函数,转而使用createApp创建vue应用
1
2
3
4
5
6
7
|
<div id="app1"></div>
<div id="app2"></div>
<script>
createApp(根组件).use(...).mixin(...).component(...).mount("#app1")
createApp(根组件).mount("#app2")
</script>
|
更多vue应用的api:https://vuejs.org/api/application.html
3-2. 组件实例中的API
在vue3中,组件实例是一个Proxy,它仅提供了下列成员,功能和vue2一样
属性:https://vuejs.org/api/component-instance.html
方法:https://vuejs.org/api/component-instance.html
3-3. 对比数据响应式
vue2和vue3均在相同的生命周期完成数据响应式,但做法不一样
在beforeCreate之后created之前完成数据响应式
3-4. 面试题参考答案
面试题1:为什么vue3中去掉了vue构造函数?
1
2
3
4
| vue2的全局构造函数带来了诸多问题:
1. 调用构造函数的静态方法会对所有vue应用生效,不利于隔离不同应用
2. vue2的构造函数集成了太多功能,不利于tree shaking,vue3把这些功能使用普通函数导出,能够充分利用tree shaking优化打包体积
3. vue2没有把组件实例和vue应用两个概念区分开,在vue2中,通过new Vue创建的对象,既是一个vue应用,同时又是一个特殊的vue组件。vue3中,把两个概念区别开来,通过createApp创建的对象,是一个vue应用,它内部提供的方法是针对整个应用的,而不再是一个特殊的组件。
|
面试题2:谈谈你对vue3数据响应式的理解
1
2
3
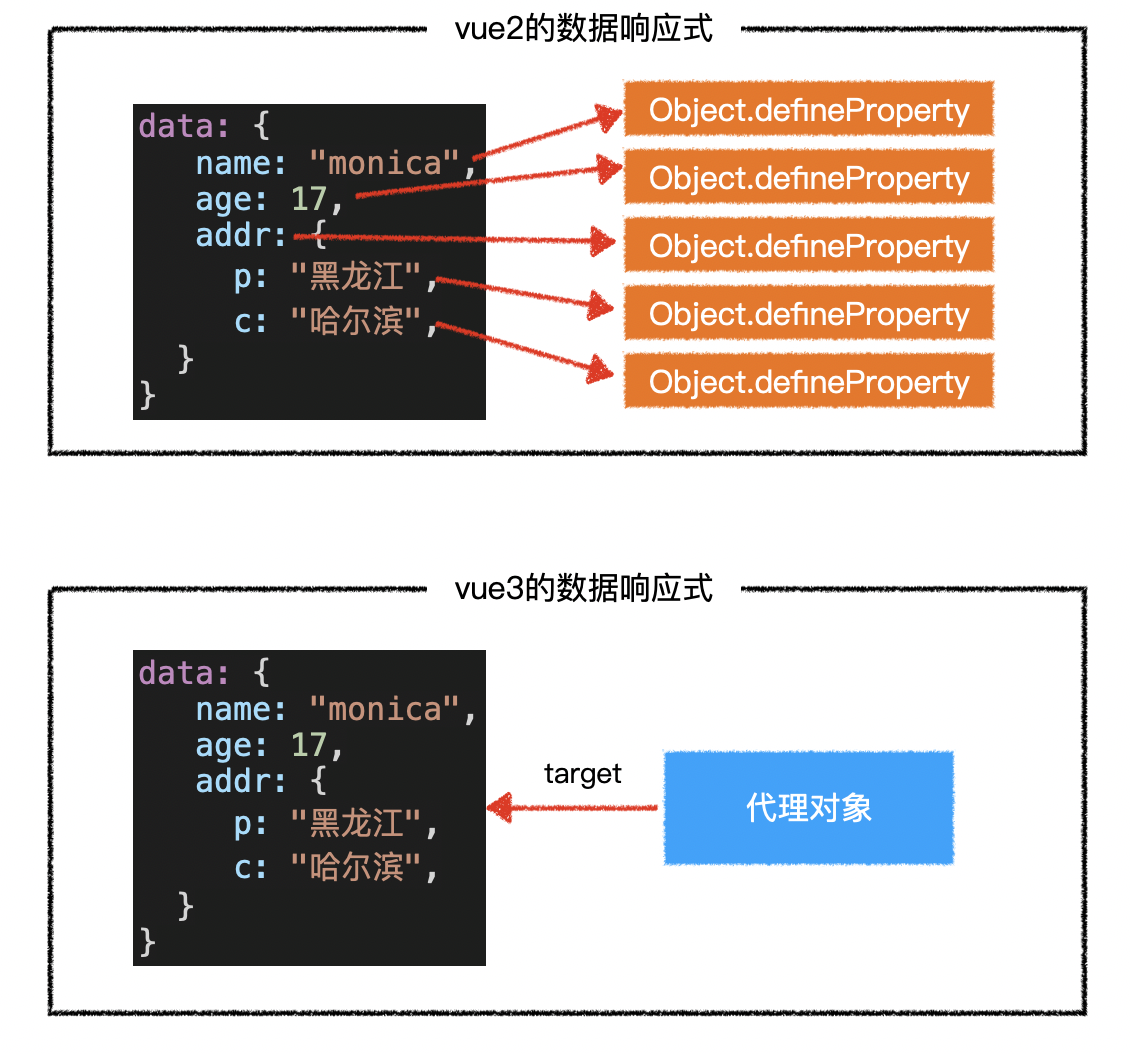
| vue3不再使用Object.defineProperty的方式定义完成数据响应式,而是使用Proxy。
除了Proxy本身效率比Object.defineProperty更高之外,由于不必递归遍历所有属性,而是直接得到一个Proxy。所以在vue3中,对数据的访问是动态的,当访问某个属性的时候,再动态的获取和设置,这就极大的提升了在组件初始阶段的效率。
同时,由于Proxy可以监控到成员的新增和删除,因此,在vue3中新增成员、删除成员、索引访问等均可以触发重新渲染,而这些在vue2中是难以做到的。
|
4. 模板中的变化
4-1. v-model
vue2比较让人诟病的一点就是提供了两种双向绑定:v-model和.sync,在vue3中,去掉了.sync修饰符,只需要使用v-model进行双向绑定即可。
.async 修饰符详情
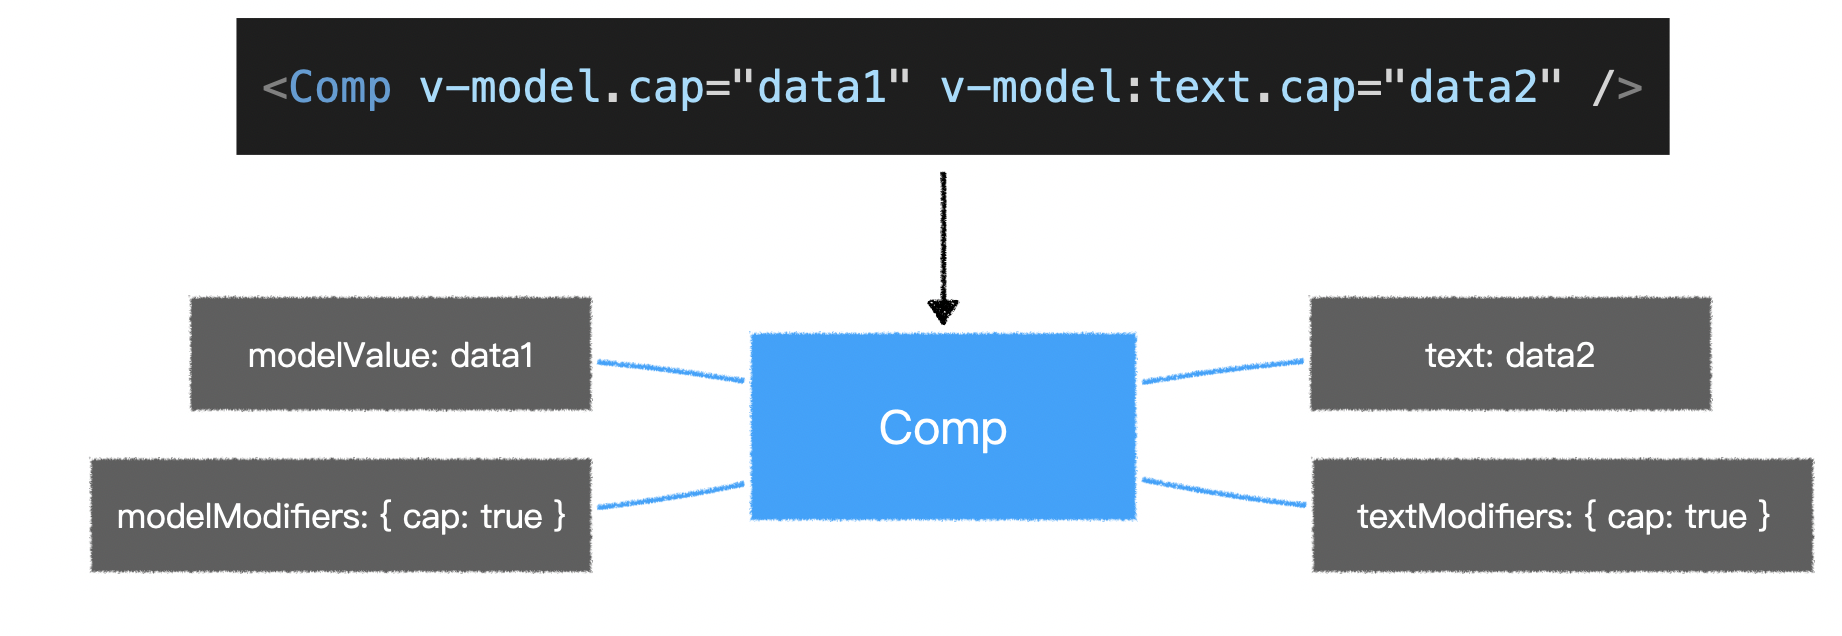
为了让v-model更好的针对多个属性进行双向绑定,vue3作出了以下修改
vue2 时用来修改v-model绑定的的属性名(value)和默认事件名称(input)
vue3 可以可以配置多个,所以移除了该配置
允许自定义v-model修饰符
vue2 无此功能
注意:属性名称和方法名称是固定的
- 默认:
modelValue 和 modelModifiers
- 自定义:
属性名 和 属性名+Modifiers
使用:直接在props中声明即可
代码示例:
1
2
3
4
5
6
7
8
9
10
11
12
13
14
15
16
17
18
19
20
21
22
23
| export default {
props: {
modelValue: Boolean,
text: String,
textModifiers: {
default: () => ({}),
},
},
setup(props, ctx) {
...
const handleTextChange = (e) => {
let value = e.target.value;
if (props.textModifiers && props.textModifiers.trim) {
value = value.trim();
}
ctx.emit("update:text", value);
};
return {
...
handleTextChange,
};
},
};
|
4-2. v-if v-for
v-if 的优先级 现在高于 v-for
1
2
3
4
5
6
7
8
|
<template v-for="(item,index) in datas" v-if="item.sell">
</template>
<template v-for="(item,index) in sells"></template>
|
4-3. key
当使用<template>进行v-for循环时,需要把key值放到<template>中,而不是它的子元素中
当使用v-if v-else-if v-else分支的时候,不再需要指定key值,因为vue3会自动给予每个分支一个唯一的key
即便要手工给予key值,也必须给予每个分支唯一的key,不能因为要重用分支而给予相同的 key
4-4. Fragment
vue3现在允许组件出现多个根节点
5. 组件变化
Vue 3 迁移指南
以下示例个功能为组件的加载方式(同步&异步)
1
2
3
4
5
6
7
8
9
10
11
12
13
14
15
16
17
18
19
20
21
22
23
24
25
26
27
28
29
30
31
32
33
34
35
36
37
38
39
40
41
42
43
44
|
<template>
<div class="container">
<div class="block">
<h2>区域1</h2>
<p>
<button @click="modalVisible = true">打开朦层</button>
</p>
<Teleport to="body">
<Modal v-if="modalVisible">
<button @click="modalVisible = false">关闭朦层</button>
</Modal>
</Teleport>
</div>
<div class="block mid">
<h2>区域2</h2>
</div>
<div class="block big"><Block3 /></div>
<div class="block big"><h2>区域4</h2></div>
<div class="block mid"><Block5 /></div>
<div class="block"><h2>区域6</h2></div>
</div>
</template>
<script>
import { ref } from "vue";
import Modal from "../components/Modal.vue";
import { getAsyncComponent } from "../util";
const Block3 = getAsyncComponent("../components/Block3.vue");
const Block5 = getAsyncComponent("../components/Block5.vue");
export default {
components: {
Block3,
Block5,
Modal,
},
setup() {
const modalVisibleRef = ref(false);
return {
modalVisible: modalVisibleRef,
};
},
};
</script>
|
异步加载功能:
注意:以下代码为测试代码
1
2
3
4
5
6
7
8
9
10
11
12
13
14
15
16
17
18
19
20
21
22
23
24
25
26
27
28
29
30
31
32
33
34
35
36
37
38
39
40
41
42
43
44
45
46
47
48
49
50
51
| import { defineAsyncComponent, h } from "vue";
export function delay(duration) {
if (!duration) {
duration = random(1000, 5000);
}
return new Promise((resolve) => {
setTimeout(() => {
resolve();
}, duration);
});
}
export function random(min, max) {
return Math.floor(Math.random() * (max - min)) + min;
}
export function getAsyncPage(path) {
return defineAsyncComponent({
loader: async () => {
NProgress.start();
await delay();
const comp = await import(path);
NProgress.done();
return comp;
},
loadingComponent: Loading,
});
}
export function getAsyncComponent(path) {
return defineAsyncComponent({
loader: async () => {
await delay();
if (Math.random() < 0.5) {
throw new TypeError();
}
return import(path);
},
loadingComponent: Loading,
errorComponent: {
render() {
return h(Error, "出错了!!!");
},
},
});
}
|
6. ReactivityApi
reactivity api: https://cn.vuejs.org/api/reactivity-utilities.html
vue3把数据响应式给暴露出来了,vue2中写在data中的数据会自动注入变成响应式数据;
1
| import {onMounted, onUnmounted, ref, computed, watchEffect} from "vue"
|
在上述方法中:
onMounted、onUnmounted 属于 compositionApi
ref、computed、watchEffect 属于 ReactivityApi
6-1. 获取响应式数据
| API |
传入 |
返回 |
备注 |
reactive |
plain-object |
对象代理 |
深度代理对象中的所有成员 |
readonly |
plain-object or proxy |
对象代理 |
只能读取代理对象中的成员,不可修改 |
ref |
any |
{ value: ... } |
对value的访问是响应式的
如果给value的值是一个对象,
则会通过reactive函数进行代理
如果已经是代理,则直接使用代理 |
computed |
function |
{ value: ... } |
当读取value值时,
会根据情况决定是否要运行函数 |
应用:
- 如果想要让一个对象变为响应式数据,可以使用
reactive或ref
- 如果想要让一个对象的所有属性只读,使用
readonly
- 如果想要让一个非对象数据变为响应式数据,使用
ref
- 如果想要根据已知的响应式数据得到一个新的响应式数据,使用
computed
6-1-1. 笔试题1:下面的代码输出结果是什么?
1
2
3
4
5
6
7
8
9
10
11
12
13
14
15
16
17
18
19
20
21
22
23
24
25
26
27
28
29
| import { reactive, readonly, ref, computed } from "vue";
const state = reactive({
firstName: "Fang",
lastName: "Bi",
});
const fullName = computed(() => {
console.log("changed");
return `${state.lastName}, ${state.firstName}`;
});
console.log("state ready");
console.log("fullname is", fullName.value);
console.log("fullname is", fullName.value);
const imState = readonly(state);
console.log(imState === state);
const stateRef = ref(state);
console.log(stateRef.value === state);
state.firstName = "Star";
state.lastName = "Lucky";
console.log(imState.firstName, imState.lastName);
console.log("fullname is", fullName.value);
console.log("fullname is", fullName.value);
const imState2 = readonly(stateRef);
console.log(imState2.value === stateRef.value);
|
结果:
state ready
changed
fullname is Bi, Fang
fullname is Bi, Fang
false
true
Star Lucky
changed
fullname is Lucky, Star
fullname is Lucky, Star
false
6-1-2. 笔试题2:按照下面的要求完成函数
笔试题2:按照下面的要求完成函数
1
2
3
4
5
6
7
8
| function useUser(){
return {
user,
setUserName,
setUserAge,
}
}
|
代码示例:
1
2
3
4
5
6
7
8
9
10
11
12
13
14
15
16
17
| import { reactive, readonly } from "vue";
function useUser(){
const userOrigin = reactive({});
const user = readonly(userOrigin);
const setUserName = (name) => {
userOrigin.name = name;
};
const setUserAge = (age) => {
userOrigin.age = age
};
return {
user,
setUserName,
setUserAge,
}
}
|
6-1-3. 笔试题3:按照下面的要求完成函数
1
2
3
4
5
6
7
| function useDebounce(obj, duration){
return {
value,
setValue
}
}
|
代码示例:
1
2
3
4
5
6
7
8
9
10
11
12
13
14
15
16
17
18
19
20
| import { reactive, readonly } from "vue";
function useDebounce(obj, duration){
const valueOrigin = reactive(obj);
const value = readonly(valueOrigin);
let timer = null;
const setValue = (newValue) => {
clearTimeout(timer);
timer = setTimeout(() => {
Object.entries(newValue).forEach([k, v] => {
valueOrigin[k] = v;
})
}, duration)
}
return {
value,
setValue
}
}
|
6-2. 监听数据变化
6-2-1. watchEffect
1
2
3
4
5
6
| const stop = watchEffect(() => {
})
stop();
|
6-2-2. watch
1
2
3
4
5
6
7
8
9
10
11
12
13
14
15
16
17
|
const state = reactive({ count: 0 })
watch(() => state.count, (newValue, oldValue) => {
}, options)
const countRef = ref(0);
watch(countRef, (newValue, oldValue) => {
}, options)
watch([() => state.count, countRef], ([new1, new2], [old1, old2]) => {
});
|
注意:无论是watchEffect还是watch,当依赖项变化时,回调函数的运行都是异步的(微队列)
应用:除非遇到下面的场景,否则均建议选择watchEffect
- 不希望回调函数一开始就执行
- 数据改变时,需要参考旧值
- 需要监控一些回调函数中不会用到的数据(检测新旧数据是否发生改变)
笔试题: 下面的代码输出结果是什么?
1
2
3
4
5
6
7
8
9
10
11
12
13
14
15
16
17
18
19
20
21
22
23
24
| import { reactive, watchEffect, watch } from "vue";
const state = reactive({
count: 0,
});
watchEffect(() => {
console.log("watchEffect", state.count);
});
watch(
() => state.count,
(count, oldCount) => {
console.log("watch", count, oldCount);
}
);
console.log("start");
setTimeout(() => {
console.log("time out");
state.count++;
state.count++;
});
state.count++;
state.count++;
console.log("end");
|
结果:
watchEffect 0
start
end
watchEffect 2
watch 2 0
time out
watchEffect 4
watch 4 2
6-3. 判断
6-4. 转换
6-4-1. unref
等同于:isRef(val) ? val.value : val
应用:
1
2
3
4
| function useNewTodo(todos){
todos = unref(todos);
}
|
6-4-2. toRef
得到一个响应式对象某个属性的ref格式
1
2
3
4
5
6
7
8
9
10
11
12
| const state = reactive({
foo: 1,
bar: 2
})
const fooRef = toRef(state, 'foo');
fooRef.value++
console.log(state.foo)
state.foo++
console.log(fooRef.value)
|
6-4-2. toRefs
把一个响应式对象的所有属性转换为ref格式,然后包装到一个plain-object中返回
1
2
3
4
5
6
7
8
9
10
11
12
13
| const state = reactive({
foo: 1,
bar: 2
})
const stateAsRefs = toRefs(state)
|
应用:
1
2
3
4
5
6
7
8
9
10
11
12
13
14
15
16
17
18
19
20
21
22
23
24
25
26
27
28
| setup(){
const state1 = reactive({a:1, b:2});
const state2 = reactive({c:3, d:4});
return {
...state1,
...state2
}
}
setup(){
const state1 = reactive({a:1, b:2});
const state2 = reactive({c:3, d:4});
return {
...toRefs(state1),
...toRefs(state2)
}
}
function usePos(){
const pos = reactive({x:0, y:0});
return pos;
}
setup(){
const {x, y} = usePos();
const {x, y} = toRefs(usePos());
}
|
6-5. 降低心智负担
所有的composition function均以ref的结果返回,以保证setup函数的返回结果中不包含reactive或readonly直接产生的数据
1
2
3
4
5
6
7
8
9
10
11
12
13
14
15
16
17
18
19
20
21
22
23
24
25
26
| function usePos(){
const pos = reactive({ x:0, y:0 });
return toRefs(pos);
}
function useBooks(){
const books = ref([]);
return {
books
}
}
function useLoginUser(){
const user = readonly({
isLogin: false,
loginId: null
});
return toRefs(user);
}
setup(){
return {
...usePos(),
...useBooks(),
...useLoginUser()
}
}
|
7. Composition Api
不同于reactivity api,composition api提供的函数很多是与组件深度绑定的,不能脱离组件而存在。
7-1. setup
1
2
3
4
5
6
7
8
9
|
export default {
setup(props, context){
}
}
|
context对象的成员
| 成员 |
类型 |
说明 |
| attrs |
对象 |
同vue2的this.$attrs |
| slots |
对象 |
同vue2的this.$slots |
| emit |
方法 |
同vue2的this.$emit |
7-2. 生命周期函数
| vue2 option api |
vue3 option api |
vue 3 composition api |
| beforeCreate |
beforeCreate |
不再需要,代码可直接置于setup中 |
| created |
created |
不再需要,代码可直接置于setup中 |
| beforeMount |
beforeMount |
onBeforeMount |
| mounted |
mounted |
onMounted |
| beforeUpdate |
beforeUpdate |
onBeforeUpdate |
| updated |
updated |
onUpdated |
| beforeDestroy |
==改== beforeUnmount |
onBeforeUnmount |
| destroyed |
==改==unmounted |
onUnmounted |
| errorCaptured |
errorCaptured |
onErrorCaptured |
| - |
==新==renderTracked |
onRenderTracked |
| - |
==新==renderTriggered |
onRenderTriggered |
新增钩子函数说明:
| 钩子函数 |
参数 |
执行时机 |
| renderTracked |
DebuggerEvent |
渲染vdom收集到的每一次依赖时 |
| renderTriggered |
DebuggerEvent |
某个依赖变化导致组件重新渲染时 |
DebuggerEvent:
- target: 跟踪或触发渲染的对象
- key: 跟踪或触发渲染的属性
- type: 跟踪或触发渲染的方式
面试题: composition api相比于option api有哪些优势?
从两个方面回答:
- 为了更好的逻辑复用和代码组织
- 更好的类型推导
1
2
| 有了composition api,配合reactivity api,可以在组件内部进行更加细粒度的控制,使得组件中不同的功能高度聚合,提升了代码的可维护性。对于不同组件的相同功能,也能够更好的复用。
相比于option api,composition api中没有了指向奇怪的this,所有的api变得更加函数式,这有利于和类型推断系统比如TS深度配合。
|
8. 共享数据
8-1. vuex方案
在vue2中不适合中小型项目,
vue3中多了些新的选择,但是vuex还是比较复杂些,不适合中小型项目
安装vuex@4.x
两个重要变动:
- 去掉了构造函数
Vuex,而使用createStore创建仓库
- 为了配合
composition api,新增useStore函数获得仓库对象
代码示例[store]:
1
2
3
4
5
6
7
8
9
10
11
12
13
14
15
16
17
18
19
20
21
22
23
24
25
26
27
28
29
30
31
|
import loginUser from "./loginUser";
import { createStore, createLogger } from "vuex";
export default createStore({
modules: {
loginUser,
},
plugins: [createLogger()],
});
export default {
namespaced: true,
state: {
user: null,
loading: false,
},
mutations: {
...
setLoading(state, payload) {
state.loading = payload;
}
},
actions: {
async login({ commit }, { loginId, loginPwd }) {
...
commit("setLoading", false);
...
}
},
};
|
1
2
3
4
5
6
7
8
9
10
11
12
13
14
15
16
17
18
19
20
21
22
23
24
|
<script>
...
import { useStore } from "vuex";
import { useRouter } from "vue-router";
export default {
setup() {
...
const store = useStore();
const router = useRouter();
const handleSubmit = async () => {
const user = await store.dispatch("loginUser/login", {
...
});
...
router.push("/");
};
return {
...
};
},
};
</script>
|
8-2. global state
由于vue3的响应式系统本身可以脱离组件而存在,因此可以充分利用这一点,轻松制造多个全局响应式数据
代码示例:
1
2
3
4
5
6
7
8
9
10
11
12
13
14
15
16
17
18
19
20
21
22
23
24
25
26
27
28
29
30
31
|
import { reactive, readonly } from "vue";
import * as userServ from "../api/user";
const state = reactive({ user: null, loading: false });
export const loginUserStore = readonly(state);
export async function login(loginId, loginPwd) {
state.loading = true;
const user = await userServ.login(loginId, loginPwd);
state.user = user;
state.loading = false;
}
export async function loginOut() {
state.loading = true;
await userServ.loginOut();
state.loading = false;
state.user = null;
}
export async function whoAmI() {
state.loading = true;
const user = await userServ.whoAmI();
state.loading = false;
state.user = user;
}
|
1
2
3
4
5
| <script>
import { login, loginUserStore } from "../store/useLoginUser";
...
</script>
|
8-3. Provide&Inject
在vue2中,提供了provide和inject配置,可以让开发者在高层组件中注入数据,然后在后代组件中使用
除了兼容vue2的配置式注入,vue3在composition api中添加了provide和inject方法,可以在setup函数中注入和使用数据
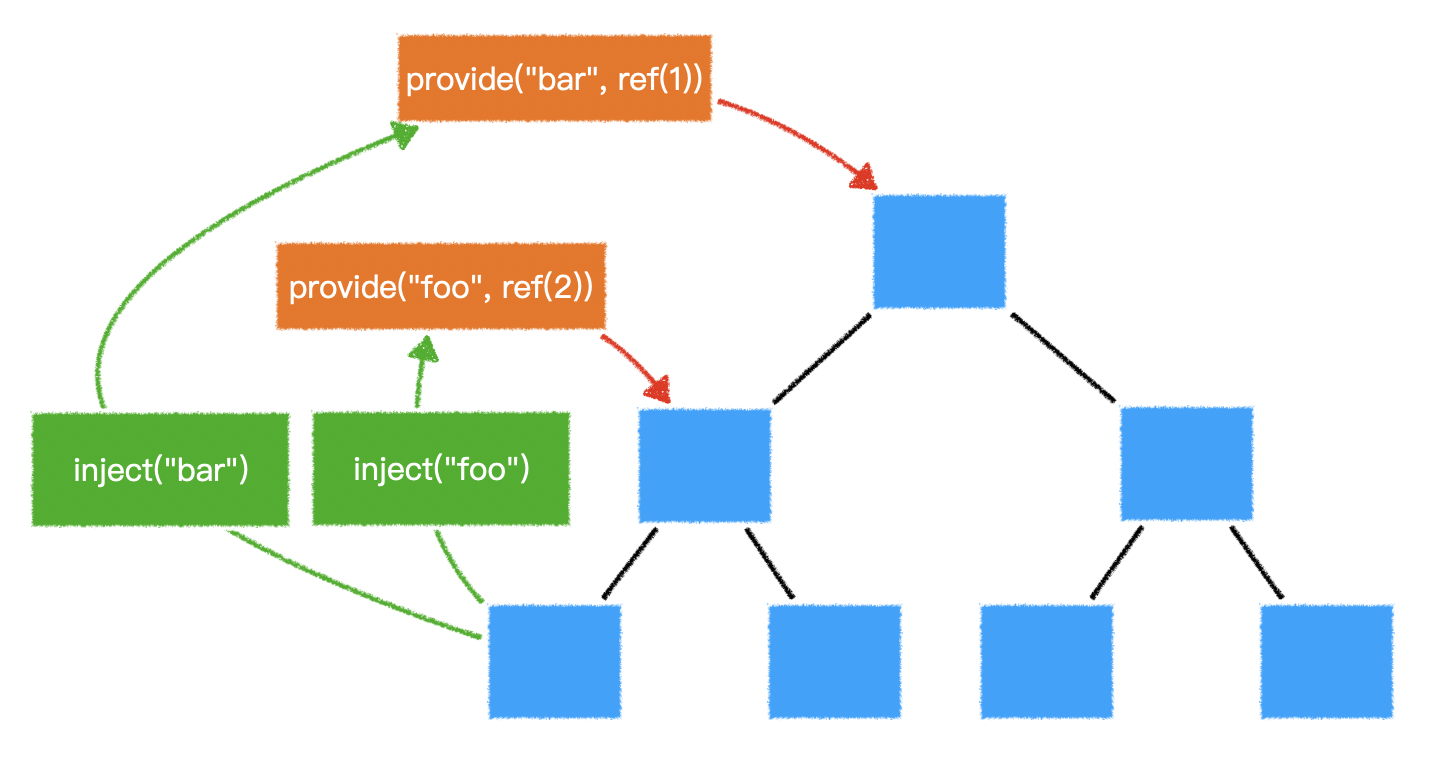
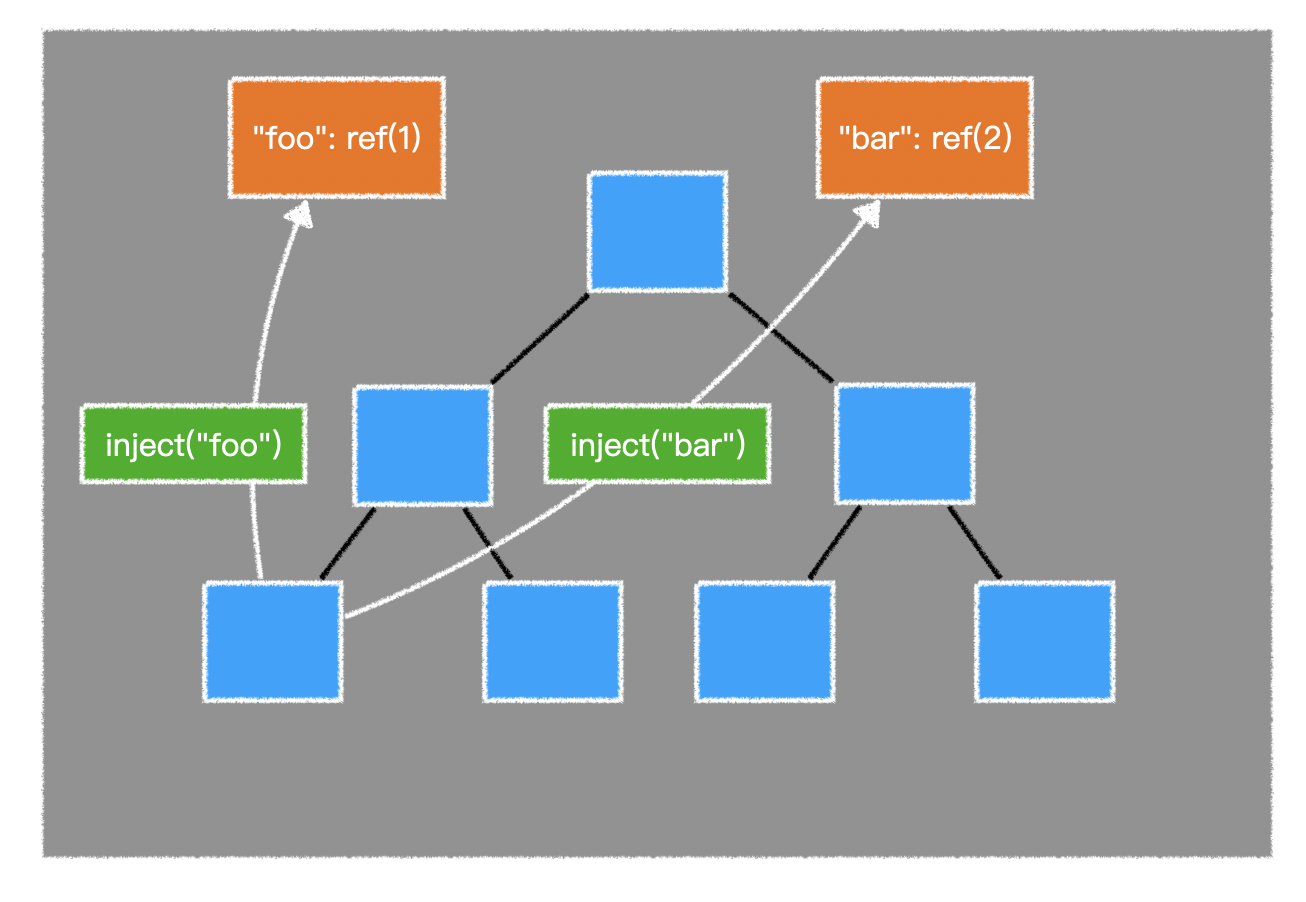
考虑到有些数据需要在整个vue应用中使用,vue3还在应用实例中加入了provide方法,用于提供整个应用的共享数据
1
2
3
4
| creaetApp(App)
.provide("foo", ref(1))
.provide("bar", ref(2))
.mount("#app");
|
因此,我们可以利用这一点,在整个vue应用中提供共享数据
示例代码功能:在一个项目中存在多个vue实例;不同实例使用不同的共享数据
1
2
3
4
5
6
7
8
9
10
11
12
13
14
15
16
17
18
19
20
21
22
23
24
25
26
27
28
29
30
31
32
33
34
35
36
37
38
39
40
41
42
43
44
45
46
47
48
49
50
51
52
53
54
55
56
57
58
59
60
61
62
63
|
import { readonly, reactive, inject } from "vue";
const key = Symbol();
export function provideStore(app) {
const state = reactive({ user: null, loading: false });
async function login(loginId, loginPwd) {
state.loading = true;
const user = await userServ.login(loginId, loginPwd);
state.loginUser = user;
state.loading = false;
}
async function loginOut() {
state.loading = true;
await userServ.loginOut();
state.loading = false;
state.loginUser = null;
}
async function whoAmI() {
state.loading = true;
const user = await userServ.whoAmI();
state.loading = false;
state.loginUser = user;
}
app.provide(key, {
state: readonly(state),
login,
loginOut,
whoAmI,
});
}
export function useStore(defaultValue = null) {
return inject(key, defaultValue);
}
import { provideStore as provideLoginUserStore } from "./useLoginUser";
export default function provideStore(app) {
provideLoginUserStore(app);
}
import { createApp } from "vue";
import provideStore from "./store";
const app = createApp(App);
provideStore(app);
app.mount("#app");
|
8-4. 对比
|
vuex |
global state |
Provide&Inject |
| 组件数据共享 |
✅ |
✅ |
✅ |
| 可否脱离组件 |
✅ |
✅ |
❌ |
| 调试工具 |
✅ |
❌ |
✅ |
| 状态树 |
✅ |
自行决定 |
自行决定 |
| 量级 |
重 |
轻 |
轻 |
9. script setup
script setup官方文档
script setup 是一个语法糖,本身并没有带来任何新功能
轮播图部分代码示例:
1
2
3
4
5
6
7
8
9
10
11
12
13
14
15
16
17
18
19
20
21
22
23
24
25
26
27
28
29
30
31
32
33
34
| <script>
import { ref } from 'vue';
export default {
props: {
imgs: {
type: Array,
default: () => [],
},
},
emits: ['change'],
setup(props, { emit, expose }) {
const index = ref(0);
function switchTo(i) {
if (i < 0) {
i = 0;
} else if (i > props.imgs.length - 1) {
i = props.imgs.length - 1;
}
if (i === index.value) {
return;
}
index.value = i;
emit('change', i);
}
expose({
switchTo,
});
return { index, switchTo };
},
};
</script>
|
setup语法糖示例:
1
2
3
4
5
6
7
8
9
10
11
12
13
14
15
16
17
18
19
20
21
22
23
24
25
26
27
| <script setup>
import { ref } from 'vue';
const props = defineProps({
imgs: {
type: Array,
default: () => [],
},
});
const emit = defineEmits(['change']);
defineExpose({
switchTo,
});
const index = ref(0);
function switchTo(i) {
if (i < 0) {
i = 0;
} else if (i > props.imgs.length - 1) {
i = props.imgs.length - 1;
}
if (i === index.value) {
return;
}
index.value = i;
emit('change', i);
}
</script>
|
区别:
传统方式(setup函数)中返回的所有方法和属性都会附着在组件实例上;父组件可以通过ref获取到组件实例进行调用方法和修改属性;可以通过expose配置需要暴露的方法和属性,传递空则不会暴露任何方法;
script setup:组建中的方法和实例是不会附着在组件自身上的,可以通过defineExpose配置需要暴露的方法和属性,无该配置则不会暴露任何属性和方法
__END__